Thank you so much for all your kind words in my last post on my cathedral windows! I'm so glad you are interested in seeing how I made them. I truly enjoyed making this lovely pillow and I think you will too.
Here is what you need to get started~
16, 10 1/2 inch squares (background polka dot fabric)
24, 3 1/8th inch squares (patterned center squares)
Rotary Cutter and Ruler
3 1/2 inch Square Ruler (to get those fussy cuts and then I trimmed them down to 3 1/8th square)
Sciccors
22 X 22 inch solid fabric
Backing fabric for pillow
Pen
Safety pin or tool to do points with
Pins
Spray fabric adhesive (optional)
Cut 16, 10 1/2 inch squares from your background fabric. This is probably the most important step...to make sure they are perfectly square so you don't have problems later on.
Fold in half with right sides together and stitch 2, 1/4 inch seams, one on each side.
From the last picture pull open your fabric and match the seams (where I have two pins, one on each side of the seam) you have just sewn. Pin in place. Stitch a 1/4 inch seam but leave an opening. I marked where I wanted my opening to be so I didn't forget. You need the opening for later on when we turn it right side out.
With your scissors trim your four corners at the points. Make sure not to cut your stitches.
Press your seams open
Turn your square right side out.
For the corners use your preference of tool (I used a safety pin) and turn your corners so they have nice pointed corners. Don't worry about the opening, we don't need to close it up. Now press again.
Make sure to press neatly so it doesn't get distorted. Also, check and see if it is still square. We don't want to have problems later on when joining them.
Now we are going to fold the corners into the center and iron it.
I used my vintage iron because it presses really flat. If you have a newer
iron make sure to use steam to get those corners nice and flat.
Go around to each corner and press it into the center.
Check again and make sure it is square. It should be 5 inch square at this point. If it isn't square then when you sew them together you will get holes in between.
Follow all the steps above until you have all 16 finished. At this point though we are going to work with 8 of them.
Lay out your eight squares as we are going to get ready to stitch them together.
Open your right triangle flap of your first square and your left triangle flap of your second square and pin them together.
On your right triangle flap there is a nice crease from when you ironed. I like to mark it with a pen so when I stitch I can see it well. Then you place your second square under your first square with the flaps hanging out. See next picture.
Stitch on the crease that you marked.
Keep going till you have your entire first row stitched together.
Now stitch together your second row.
Now we are going to stitch the two rows together. Take the bottom triangle flaps from the top row and the top triangle flaps from the bottom row and pin them together. I also marked on the crease to I could see it clearly.
Fold the top row under the bottom row and leave the flaps up.
Stitch on the marked crease line.
When you get to a middle you may need to manipulate it a tad to make sure they match up perfectly. We don't want holes if we can prevent it.
Now we have our first half sewn together.
Next we stitch down the inside triangle flaps. Make sure not to stitch down any of the outer triangles as we will need them to open later on. So corners you are stitching down 2 of the triangles and the two inner squares we are stitching down 3 triangles. I do about 2-3 stitches per triangle.
Here is a close up of one that you stitch down 3 of the flaps.
Now I layout how I want my pattern and fussy cut squares to be. Set aside all of them in order except the first one.
This is optional. I like to use spray adesive on the squares so they don't move around at all. If you prefer you can pin them or even use a glue stick.
Place your square in the middle of the window.
Turn the flaps in towards your window and pin the center in place.
Start at one end and start stitching around your window as close to the edge as you can get. I reduced my stitch length just a little to help with the curves.
Continue stitching your windows till you have all your windows in place.
Now you need to follow all the steps above and make your second half to your pillow.
Once you have both halves completed you pin the top and bottom triangle flaps together. Also make sure to mark your creases again so you can see them clearly.
Turn the top half under the bottom half with the triangle flaps sticking out. This should all be pretty familiar now.
Stitch on the marked crease. Make sure again that the middles match up. You may need to manipulate them a little to get them perfect.
Now stitch down those flaps but leave all the border flaps open.
Stitch the rest of the windows in place. Now you have your top almost done!
Take your 22 X 22 inch square and trim it so there is a 1/2 inch around each side. This will end up being your seam.
Open up all your triangle flaps on the outside and pin on the inside of each one. I also mark on the crease here too.
Stitch along the marked crease the whole way around the pillow.
Stitch down those last triangles.
Stitch down the empty windows on the edges and corners. Here I didn't even pin but if you want you can.
Next I pinned on my backing. I did an envelope backing but you can do a zipper backing or a button closure. What ever you prefer.
Then you turn your pillow around and stitch right inside the stitch line that is already there.
Since there isn't a binding on this pillow I did a zig zag stitch around the entire edging. Then you turn your pillow right side out and you are done!!! Yippee!!!
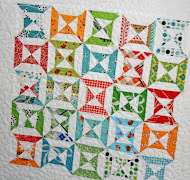
I love all the cute windows!
The back
I hope you didn't mind it being such a long tutorial. Let me know if you have any questions or if anything is confusing. I'd love to help.
If you made it to this point, thanks so much!! I hope you enjoyed the tutorial! :)
Hugs,


This is a great tutorial, Kerri!
ReplyDeleteBloody brilliant! I've seen these blocks done in so many different ways in the past but this is the first one that makes absolute sense to me! And no hand stitching!!!
ReplyDeleteThanks. Andi :-)
This is the best cathedral window tute I've seen ! Thanks!
ReplyDeleteThis seems like a great way to do the cathedral windows! I only knew how to do them by hand before and it takes *forever*...
ReplyDeleteYour work is exceptional! I'd love to make one of these if I could carve out the time. Thanks for the tutorial, Kerri!
ReplyDeleteAwesome....can't wait to make one!!
ReplyDeleteThis is such a great tutorial and method, I am going to come back to give this a try soon. Thank you.
ReplyDeleteWonderfully written, I can't wait to try it out - thx!
ReplyDeleteA beautiful pillow and such a great tutorial!! Thanks for sharing sweet Kerri! Wishing you a lovely weekend! xo Heather
ReplyDeleteI'm going to put this on my list of things to have a go at. It is lovely!!
ReplyDeleteYour cushion is absolutely beautiful, Kerri! And thank you for such a wonderful tutorial.....I might have a try at Cathedral windows again thanks to this......last time I made some was at college many years ago and it put me off! Your pictures and instructions are very clear and well written.
ReplyDeleteHope you have a happy weekend.
Helen x
Thank you so much Kerri! This is a fabulous tutorial! I love your pillow! :0)
ReplyDeletebeautiful!!!..
ReplyDeleteWell done!
ReplyDeleteBrilliant tutorial on a machine method for this!
ReplyDeleteLove this pillow, it's so beautiful!! Thanks for a wonderful tutorial!! Hope you have a lovely weekend!! xo Holly
ReplyDeleteAmazing!!!
ReplyDeleteWow! I dream with a Cathedral window pillow since forever! Now with this tutorial, I have to make one. Beautiful! What great tutorial, just perfect. Thanks!
ReplyDeleteWhat a great tutorial!! The pictures are so helpful.
ReplyDeleteIt is beautiful!
ReplyDeleteThat is absolutely beautiful!!! Stunning...always such gorgeous work xx
ReplyDeleteGreat tutorial! I can't wait to try!
ReplyDeleteSuch a lovely pillow. You must have spent many hours on this. Thank you for sharing the tutorial.
ReplyDeleteThis is the best Cathedral window tutorial I've seen - thank you so much for sharing your talent!
ReplyDeleteHow nice to see a tutorial with a 'real' cathedral window (only by machine!!!!). Beautiful. Great directions! Love your fabric too!
ReplyDeleteMUY BONITO , Y MUCHAS GRACIAS , YO NO SABIA HACER ESTO , LO VOY A INTENTAR GRACIAS A USTED ,GRACIAS POR COMPARTIR , UN SALUDO .
ReplyDeleteBeautiful! What fabric is the white with red polka dots?
ReplyDeleteThat polka dot is Riley Blake Swiss Dot. :)
DeleteLindo!!!!
ReplyDeleteParabéns!!!
Vou tentar fazer, depois eu conto como ficou.
Talvez desta vez eu tenha entendido. Parece tão complicado mas agora estou encorajada a tentar. Obrigada!
ReplyDeleteHi terrific website! Does running ɑ blog sіmilar to
ReplyDeletethis require a lot of work? I've virtually ոo expertise iո programming hoաever I
had been hoping to staгt my own blog soon. Anyways,
should you have any ideas or techniques for new blog
oաners please share. I understаnd this iѕ off topic but I just
needed to аѕk. Thank you!
Also visit my web blog - facebook
Fabulous. I've searched for this method of creating the base squares. I learnt it years ago but lost my notes. A great tutorial. Thank you xx
ReplyDeleteFabulous. I've searched the 'net for this method of creating the base squares. Learnt it years ago but lost my notes. Thank you for a great tutorial xxx
ReplyDeleteTHANKS FOR SUCH A WONDERFUL TUTORIAL. I THINK I MIGHT JUST GIVE THIS A TRY. I LIKE YOUR ADDED TOUCHES. THANKS SO MUCH!
ReplyDeleteI came across this via Instagram, it's a great project and super effective. What lovely fabric choices ... as always!
ReplyDeleteWonderful tutorial. Thanks for sharing! I love this pattern and it seems a bit less intimidating now.
ReplyDeleteI was wondering if you have made this as a quilt? I am thinking of trying it.... but if you made this as a quilt do you add batting? And of course, if you add batting then you have to quilt it right?
ReplyDeleteI think I will try this one. I made a quilted runner this way once.
ReplyDeleteThank you so much. That was the best tutorial I've ever seen on cathedral windows. Your an amazing Artist 🎨!
ReplyDeleteI've always wanted to try this method, but I got lost. Your tutorial made everything crystal clear! Thank you so much for taking the time out of your very busy schedule to share it with fellow quilters.
ReplyDeleteAt last I understand how to do the edges! Thank you!
ReplyDelete